E-Marketing for the Sage SalesLogix Web Client: Call Lists Tab
This guide explains the features of the Sage SalesLogix E-Marketing Call Lists tab.
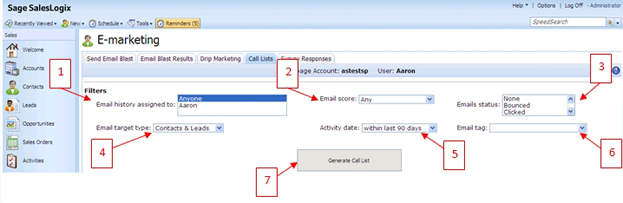
Call Lists are ranked lists of your most interested contacts based on their interaction with a specific email campaign or a combination of email campaigns. For instance, if Joe opens your email three times and clicks on four different links in the email, he is considered a “Hot” contact, whereas Jane—who opened your email once and clicked on no links—is considered only a “Mild” contact. Joe’s name therefore appears higher on the Call List than Jane’s, because Joe has shown more interest in the email. (The amount of opens and clicks a recipient has is a good indicator of their interest in your email.) The Call List is automatically sorted from the highest score to the lowest score, so that you can contact your most interested leads first. Create a Call List based on the filters listed in 1-6 below. Note: all of these filters are optional.
- Filter based on which Sage SalesLogix user the email history has been assigned to. Highlight the user or just highlight “Anyone” to select all users.
- Filter based on Email score. Scores are determined based on opens, clicks, bounces, and so on.
- Filter based on Email status, again with options for bounces, clicks, opens, and so on.
- Filter based on Email target type—contacts, leads, or contacts & leads.
- Filter based on Activity date, based on how recently you sent the email blast(s) to be included in the Call List.
- Filter based on Email tag, from tags you have defined in previous Sage SalesLogix E-Marketing sends.
- When you are finished setting your filters, click Generate Call List and the Call List will appear in the lower half of the screen. From that point, further options appear allowing you to assign the Call List to a specific Sage SaleLogix user or schedule a phone call for Call List targets.