E-Marketing for the Sage SalesLogix Web Client: Drip Marketing Tab
This guide explains the features of the Sage SalesLogix E-Marketing Drip Marketing tab.
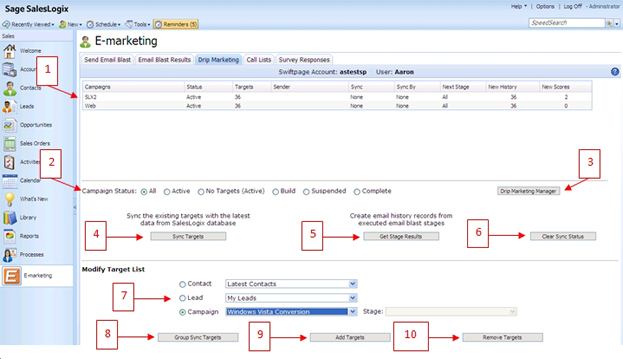
- All of your Drip Marketing Campaigns will appear at the top of the screen, along with their Status, the number of targets they include, the Sage SalesLogix user on whose behalf emails in the Campaign are sent, the presence of any Sync Stage or Sync By date, the Next Stage to come, the number of New History records to be written, and the number of New Scores to be written.
- Choose which Drip Marketing Campaigns are shown by selecting one of the option buttons to filter the view if desired.
- The Drip Marketing Manager button opens a new web page and shows the Drip Marketing Campaign Manager screen, where you can create and edit your Drip Marketing Campaigns.
- Click Sync Targets to sync the targets in your Drip Marketing Campaign with your Sage SalesLogix database—it updates your Drip Marketing targets with the most current Sage SalesLogix database information. When you select it, you will receive a confirmation screen:
- Click Get Stage Results to import the results of your Drip Marketing Campaigns into your Sage SalesLogix database. There will be a number in the New History or New Scores at the top of the Drip Marketing window if a particular Campaign has results to import into Sage SalesLogix. When you click this button, the following screen will appear:
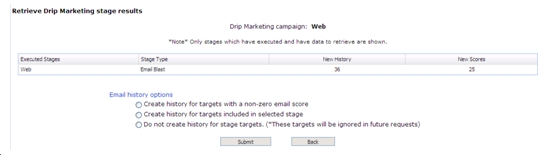
Choose the option button you want, depending on the type of history records you wish to create for the targets shown. When you have made your select, click Submit.
- Clear Sync Status: if you have set a Stage in your Drip Marketing Campaign to require a sync prior to the Stage’s execution, you can clear the needed Sync by highlighting the Campaign and clicking Clear Sync Status. Once you do this, the “Sync By” date will disappear.
- In the Modify Target List section, you can select targets based on Contact groups, Lead groups, or Campaigns. Use the option buttons and drop-down lists to select the targets you wish to add or remove to/from your Drip Marketing Campaign. Then you have the following options:
- Group Sync Targets: if you are using a specific Sage SalesLogix group as the target group for a Drip Marketing Campaign, the Group Sync Targets button allows you to keep your Drip Campaign contact list current. Select your Group using the option buttons in the “Modify Target List” section of the Drip Marketing tab. Then click Group Sync Targets, and a screen will appear confirming the sync with the selected Sage SalesLogix group. (Note: groups larger than 3,000 will have to be synced by using the Add and Remove Targets functions.)
- Add Targets: this button is used to add targets to Drip Marketing Campaigns (the targets selected in the Modify Target List section). When you select your targets and click Add Targets, a screen will appear confirming the targets to be added to your Drip Marketing Campaign.
- Remove Targets: this button is used to remove targets from Drip Marketing Campaigns (the targets selected in the Modify Target List section). When you select your targets and click Remove Targets, a screen will appear confirming the targets to be removed from your Drip Marketing Campaign.