E-Marketing for the Sage SalesLogix Web Client: Send Email Blast Tab
This page explains the features of the Sage SalesLogix E-Marketing Send Email Blast tab.
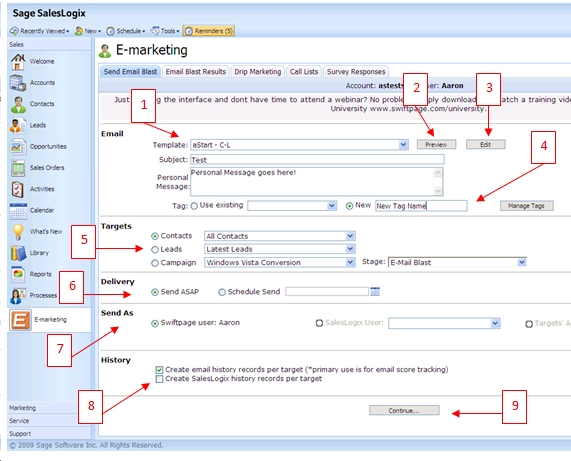
- In the Email section of the Send Email Blast tab, you can select your template from the Template drop-down list. Enter the subject line for your email blast, and a Personal Message (if applicable).
- The Preview button opens a new web page with a preview of the template selected in the Template drop-down list.
- The Edit button opens the Sage SalesLogix E-Marketing Template Editor, where you can edit the template selected in the Template drop-down list.
- In the Tag section, you can use the option button and drop-down list to select one of your existing Sage SalesLogix tags for your email blast. Or, use the option button for New and enter a new tag name. Click Manage Tags to rename, edit or delete Sage SalesLogix tags.
- There are three types of Targets you can send to. Select the option button for Contacts, Leads or Campaign, and then use the drop-down lists to select specific targets for your email blast.
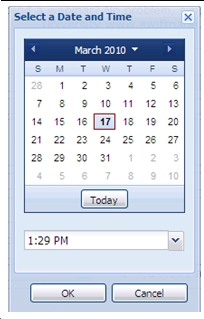
- Under Delivery, you can choose either to Send ASAP (which will queue the email blast for immediate delivery) or Schedule Send. The Schedule Send option opens a calendar from which you can choose the date and time of your email blast (see below).
- Send As: you have three choices here:
- Choose to send as the user you are logged in as,
- Choose a Sage SalesLogix user from the drop-down list to send on that user’s behalf, or
- Select the Targets’ Account Manager option to send each email on behalf of the Sage SalesLogix user who is specified as each target’s account manager. (For instance, if target Mike Jones’ account manager is Sage SalesLogix user Shelia and target Jane Franklin’s account manager is Sage SalesLogix user James, the email to Mike will appear to be from Shelia and the email to Jane will appear to be from James.) Note: if you use this option, make sure that each account manager for the selected targets is also an active Sage SalesLogix E-Marketing user on your account.
- History: choose to create email history records for each target ,and/or Sage SalesLogix history records for each target, or neither.
- The Continue… button will offer a verification page showing you which targets will be included, when the email will be sent, the Sage SalesLogix user(s) the email will be sent as, and other details of the send:
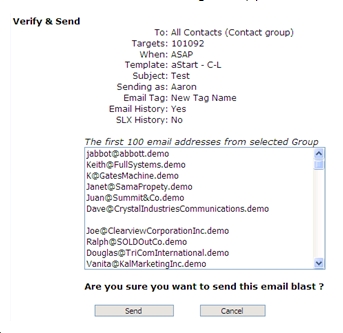
If this looks correct, click Send, and your email blast will be sent (or scheduled if you used the Schedule Send function). You are finished sending your email blast!