E-Marketing for the Sage SalesLogix Web Client: Account Manager
This page explains the features of the Sage SalesLogix E-Marketing Account Manager. When you first click on the Options button and then the E-Marketing tab, the following screen appears:
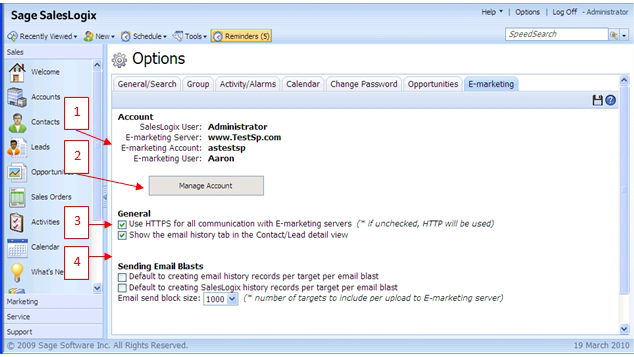
- Your Sage SalesLogix user name, E-marketing Account name and E-marketing user appear at the top of the screen.
- Enter the E-marketing Account Manager by clicking on the “Manage Account” button (see below for details).
- Under the “General” heading, you can decide how you want to connect to Sage SalesLogix E-marketing servers, and how much history to shown in the Contact/Lead detail view.
- Under “Sending Email Blasts,” you can choose what history records are written when sending an email blast, and how many records are transferred to the server at once. (Higher numbers can affect system performance, lower numbers may take longer.)
The Manage Account Window
When you click on the Manage Account button, you will be asked to input your Account password. Do so, and the following screen appears:

- Your Sage SalesLogix E-marketing account details are shown at the top of the screen, including your send limit, number of seats on your account, and so on.
- Map Sage SalesLogix User to Swiftpage emarketing
User: this button allows you connect Sage SalesLogix users with Sage SalesLogix E-Marketing users. When you click this button, the following screen appears:
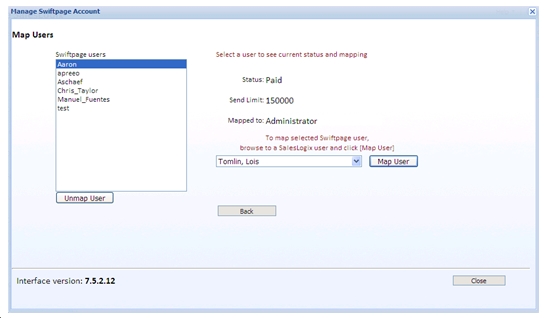
Sage SalesLogix E-marketing users are shown on the left-hand side. When you highlight an E-marketing user, their status and send limit appear, as well as the name of the Sage SalesLogix user to whom they are mapped. Click Unmap User to remove the mapping (i.e. to break the connection between the E-marketing user and the Sage SalesLogix user). If the “Mapped to” field is blank, the E-marketing user is not yet mapped to a Sage SalesLogix user. In that case, select (from the drop-down list) the Sage SalesLogix user you wish to map to the E-marketing user, then click on Map User. The E-marketing user is then mapped to the Sage SalesLogix user. Click Back at any time to return to the previous menu.
- Add Swiftpage emarketing
User ID: use this button to add a Sage SalesLogix E-marketing user to your account. When you click Add Swiftpage emarketing
User ID, the following screen appears:
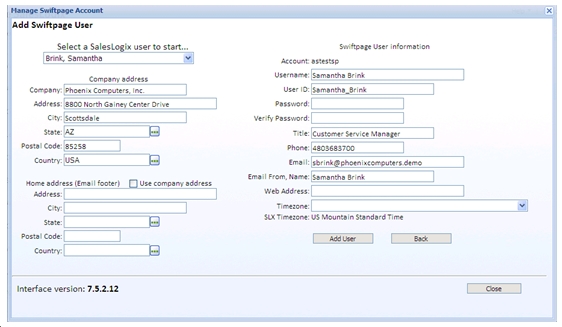
Select a Sage SalesLogix user from the drop-down list on the top left, and that user’s information is automatically populated into the applicable windows. (In the example above, selecting Samantha Brink as the Sage SalesLogix user automatically adds her contact information into other fields.) You can change any of the information you wish, including the suggested User ID that is shown. Once you have the correct options in place, click Add User, and the user is both created and mapped to the Sage SalesLogix user you chose.
- Map Swiftpage emarketing
Mail Merge Fields: use this button to map your Sage SalesLogix database fields to mail merge fields for use in your Sage SalesLogix E-marketing templates. When you click Map Swiftpage emarketing
Mail Merge Fields, the following screen appears:
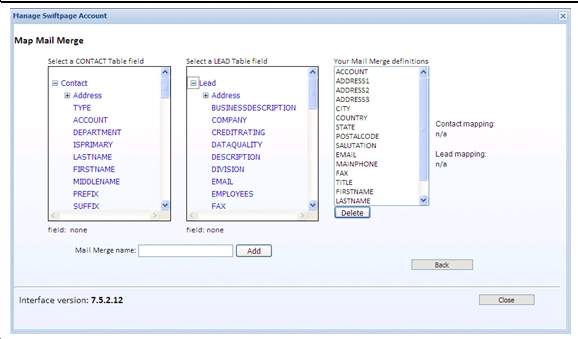
Click the plus sign (+) next to the Contact or Lead headings to display all available contact and lead fields. Click any field, and its name will appear in the “Mail Merge name” box. You can modify it at this point if you wish, then click Add. The new mail merge field will now appear in the right-hand column for “Your Mail Merge definitions.” That mail merge field is now mapped to a Sage SalesLogix contact or lead database field, and may be used in your E-marketing templates.
- Purchase/Change Seats: this button opens a new web page with your Sage SalesLogix E-marketing account settings, where you can add new seats to your existing account, raise your send limit, manage your credit card information, and so on.