Swiftpage emarketing Survey Help > Survey Result Options
The Survey Result Options page allows you to turn on functions for a survey once it has
been filled out, including an autoresponder, List Builder and List Updater, and a survey
landing page. To use the Survey Result Options page, take the following steps:
- Go to www.swiftpageconnect.com
. Click on the Login button in the top right corner.
- Type in your account name, user ID and password.
- Click Submit. You are now at the My Swiftpage emarketing
portal. Click on the Surveys button.
- You should now see the Survey Design button at the top of the page. Click it to go to the Survey Design page. You will then see a page that looks like this:
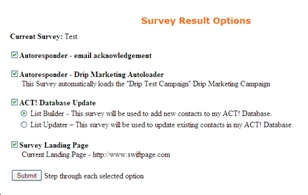
- Select the checkboxes for the options you desire:
- Once you have selected the options you want, click on the Submit button, and you will be taken one-by-one through the pages to set up the various options you have selected. For example, if you select both the Autoresponder – email acknowledgement and ACT! Database Update – List Builder options, you will be taken first to the autoresponder for email acknowledgement setup page, then to the List Builder mapping.
Autoresponder – email acknowledgement: this function sends an automatic email to every contact who fills out your survey. To learn more about the Autoresponder email acknowledgement, click here.
Autoresponder – Drip Marketing Autoloader: this will add anyone who fills out the survey into a Drip Marketing Campaign of your choosing. Click here to learn more about the Drip Marketing Autoloader.
ACT!Database Update: this function—available only with Pro and Team service levels—has two possibilities, the List Builder (which adds contacts who fill out your survey to your ACT! database) and the List Updater (which updates existing ACT! contacts when they fill out your survey). Click here to learn more about the List Builder, or click here to learn more about the List Updater.
Survey Landing Page: if you want your contacts to be taken to a Swiftpage emarketing template you design or your own web site after they finish your survey, you can set up a survey landing page. Click here for instructions on setting up a landing page (only available with Pro and Team).